
Today I bring you a 200W mod with temperature control, smart mode, bypass among other things. A mod that attracted a lot of attention for its gigantic screen and its beautiful look. It is the GeekVape Z200, of which we will do a very detailed review.
Thank Sue from Healthcabin for providing the product for the review, I leave you a link to the Z200 in case you are interested, remember that having an account, the prices are usually cheaper.
Disclaimer: This review is my own thoughts and I am not associated with anyone at HealthCabin, nor am I being paid to write this review.

| Features |
| Dual 18650 Batteries |
| AS-Chip 3.0 |
| 2.4 Inch Screen |
| Compatible With Z Sub Ohm Tank |
| Stylish And Exquisite Appearance |
| Brand | GeekVape |
| Product Name | Z200 Mod |
| Battery Type | Dual external 18650 batteries (Not included) |
| Output Power | 5W-200W |
| Working Mode | Power/Smart/TC-SS/TC-TCR/VPC/Bypass |
| Charging Port | Micro USB |
| Display Screen | 2.4-inch full screen |
| Operating Temperature | 0℃~45℃ |
| Storage Temperature | -20℃~60℃ |
| Relative Humidity | 45%RH~75%RH |
| Cooling Mode | Natural cooling |
| Fit For | GeekVape Z Sub Ohm (2021) Tank |
| Packing Size | 81mm*60mm*135mm |
| Color | Black, Silver, Blue, Gunmetal |
Packaging
The device comes inside a rectangular box that combines GeekVape’s typical colors, orange and black, as is usual for them. Above, the brand is presented to us in large and in the center, what attracts the most attention, is an image of the device. This changes depending on the color we choose, so there is individual packaging in this case. At the bottom we are shown a vaping warning and that nicotine is addictive.
On the side of the box we simply have some branding on top of an orange background.
At the top we are presented with some warnings. Just below we are shown the contents of the box. On the right side we find a QR code and the bar code and at the bottom, as before, a warning about nicotine.

- 1* Z200 Mod
- 1* USB Cable
Once we opened the box we only found the mod fitted into a custom-made hole in a kind of pad. I want to emphasize, although I suppose you already know, that it does not come with the atomizer, this is a personal RDA of mine, which I reviewed a few months ago. A hole is left to access the double bottom where the manual and Micro-USB cable will be. If you heard correctly, Micro-USB, I don’t know why they did it that way.
Once we take out the interesting stuff and put it in order, we are left with this, simply the mod and the cable, straight to the point.

Device Inspection
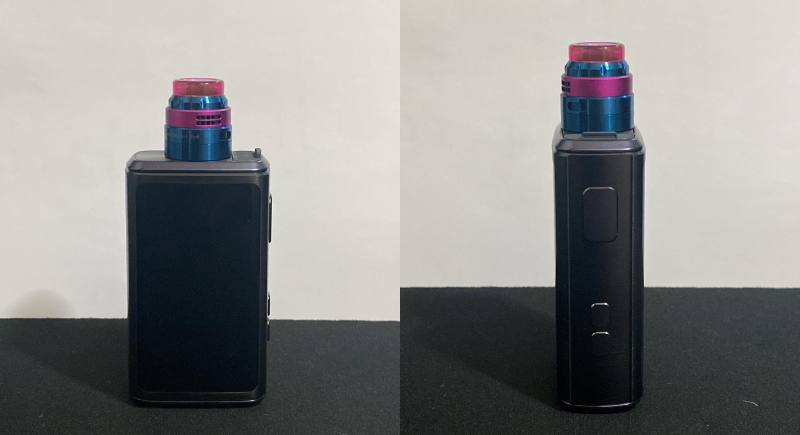
On the front of the mod the first thing that catches your attention is this gigantic screen, which makes it look like a small mobile phone. I love this about this device. The screen is 2.4″ so it will show us the information in the clearest way possible. On the right side the operation buttons protrude a little. Later we will talk about all the functions.
On one of the sides we find the buttons. From top to bottom we find the power button, the wattage up button and the wattage down button.
Here are the main functions, it is somewhat more extensive but we will talk about it later.
- Click the fire button to take a puff.
- 3 Clicks on the fire button to enter configuration mode
- 1 Click on the wattage increase to increase 0.5
- 1 Click on the wattage drop to decrease 0.5W
In the back of the mod we find a little of what is art. I love the decoration that GeekVape has used, it is simply exciting and gives a unique touch to the mod.
On the other side we simply find GeekVape written and we have small reliefs that, in addition to decorating, improve the grip quite a bit.
The screen as we mentioned previously is 2.4´´.
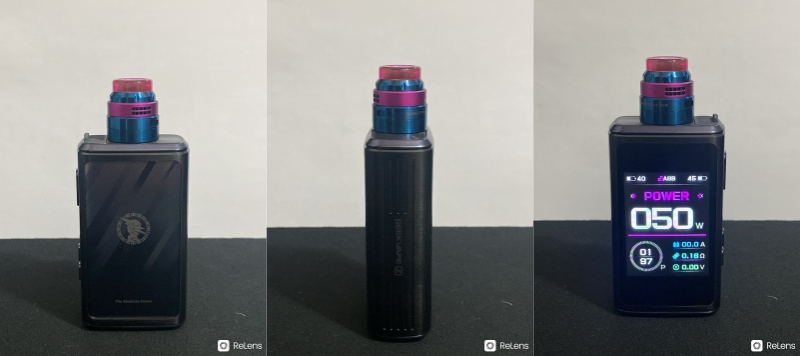
At the top left and right we will be shown the respective charge for each battery. Up in the center it will show us if we have the wattage buttons blocked and it will also show us ABB, this is a system that regulates the discharge of the batteries so that it is more linear and they discharge evenly.
In the center and in purple we get “Power”, this is the way we find ourselves, we distinguish between.
Power – It is the traditional wattage mode of all devices.
Bypass – This gives us the wattage depending on our batteries and their remaining charge, it is like a mech mod but with electronics, much safer
Smart – This will adjust the wattage depending on the Ω, recommended for GeekVape’s own atomizers, it is usually more adjusted to commercial resistors.
Temperature – I don’t entirely know how this mode works but we can control the temperature of our coil depending on whether we want a colder or warmer vape.
Let’s talk about functions, by giving 3 Clicks to the fire button we will enter the adjustment mode and we will move with the fire button. In this way we can choose between vaping modes with the + and -. Additionally, if we move to the puff counter and press + or – we will restart it.
If in the adjustment mode we press the + and – simultaneously, we will lock these buttons, to unlock them it is the same process as to lock them. If we hold these same buttons for 1 second the color of the interface will change.
If in the normal interface we press the fire button and the + or – button we can adjust the brightness of the screen.
To exit adjustment mode we will have to hold down the fire button.
This is what a 24mm RDA looks like, it has some space left and I think we could even put a 26mm one in it. As for combinations, well, that depends on each person’s taste, I personally love this one.

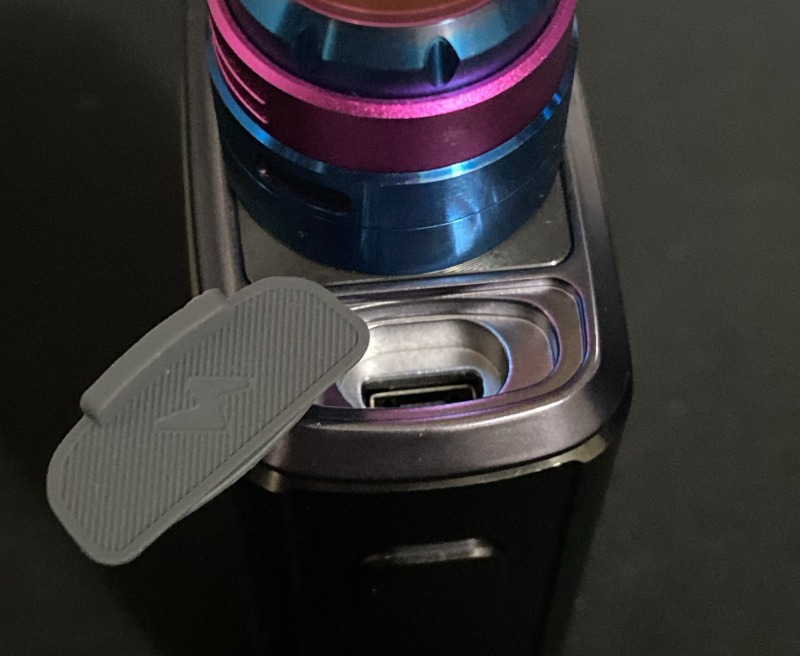
The charging port is covered with a small silicone flap, which will cover dust, water or anything that gets in the way of it. The truth is that I don’t understand why the Z200 has a Micro-USB and the T200 (slightly higher version) has a Type-C, I don’t quite understand it.
This is where the batteries will be placed, one will be with the positive facing in and the other on the contrary, with the negative facing in. This compartment is accessed through a type of slider that I will show in the following image.
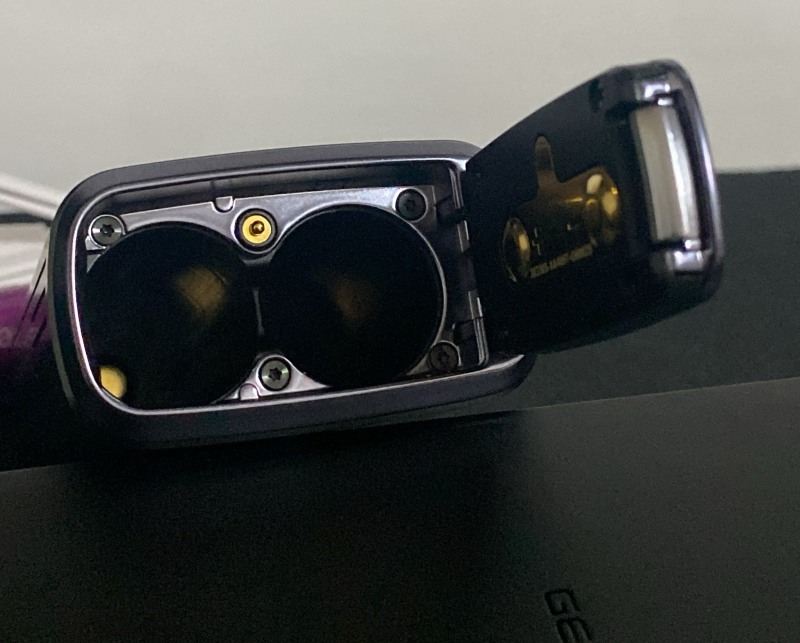
This is the door once closed, as you can see it has a slider that is activated to open it and put the batteries inside, quite easy to be honest. Only, as I have learned, after a while it usually breaks down if we don’t take care of it due to the weight of the batteries.

Vaping Time
Well let’s start with vaping time. When it comes to heating the coil, this mod is a beast, it has very fast heating and beastly efficiency. Together with the performance of the mod and a good atomizer we can achieve an incredible flavor.
What I did not like is the management of the batteries, they drain much faster than in other mods, it is not outrageous but it is quite noticeable, perhaps it is even because of the screen.
In hand it feels incredible, it doesn’t weigh much and is very comfortable. The only problem is that I’m afraid that the screen will get scratched, being so big it is very prone to that.
I must comment that in hand, there is a slight marking of the batteries inside the mod, as if the space where they are inserted was somewhat larger than the battery itself, it is somewhat uncomfortable but in the end you get used to it.
In general, it is a very good mod that gives incredible performance but in which the small details should have been worked on.
Pros and Cons
| Pros | Cons |
| Exceptional Performance | Batteries Moving Inside |
| Good Looking | Batteries Management |
| Big Screen | Screen Prone To Scratches |
| Different Modes | |
| Compact | |
| Comfortable In Hand |
Conclusion
It is a mod that I loved but I think it needs a little more work, they must work on the small details, also, I don’t understand the idea of putting in a Micro-USB these days, I’m not saying it’s bad, I just don’t understand it.
In terms of performance, weight, aesthetics, it is incredible, one of the best of GeekVape.
I would like to try the T200 to compare it.
That was the entire review, I hope you liked it, I loved doing it to be honest, any question or doubt, even constructive criticism, is accepted in the comments, have a good time vaping and thanks for reading!

This review was written by Ben from ECF & Vaping Underground, click to view original reviews.
