
Hello, and welcome to another review! Today we’ll be taking a look at the Hannya II Box Mod by Vapelustion. This is the second iteration of the Hannya box mod line (not including their pod mods) which added a new chassis style, more color options, and more side panel designs to choose from. If an oriental-style aesthetic is something you are keen to, I have a strong feeling that you’d love this mod. I have thoroughly put this this device through its paces and will be going over my experiences in detail down below. Let’s get started the Vapelustion Hannya II Mod Review together!
First off, I want to thank Sue from HealthCabin for sending me this piece of art for review. As always, this will be conducted in a fair and honest manner.
You’ll find a more brief overview of this mod over at HealthCabin. The pictures from their link speak for themselves.

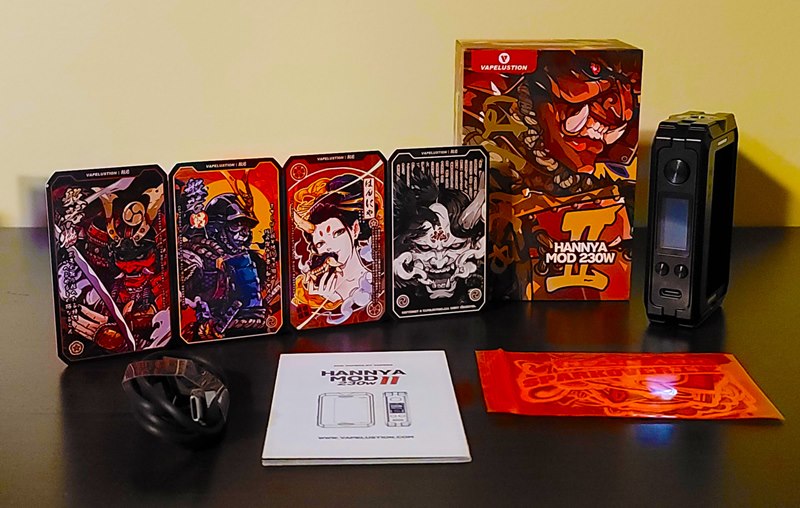
- 1 Vapelustion Hannya II box mod
- 4 Different interchangeable side panels
- 1 Ziplock full of cool stickers
- 1 USB Type-C charging cable (3 feet in length)
- 1 User manual
- Material: Zinc alloy panels, plastic chassis, stainless steel 510
- Size: 92 * 57 * 25 mm
- Batteries: 2x external 18650s (sold separately)
- Charging: Type-C charging port (0.8A w/ included cable, 1.7A with my own - does not read a 3.0 QC cable)
- Output Power: 1-230W
- Resistance Range: 0.05-3.0Ω
- Modes: VW (Power), DVW (Custom Curves), Bypass, TC (Ti, SS, Ni), and TCR (Temperature Coefficient of Resistance)
- Temperature Range: 200-600℉/100-315℃
- Screen Size: 0.96 LCD
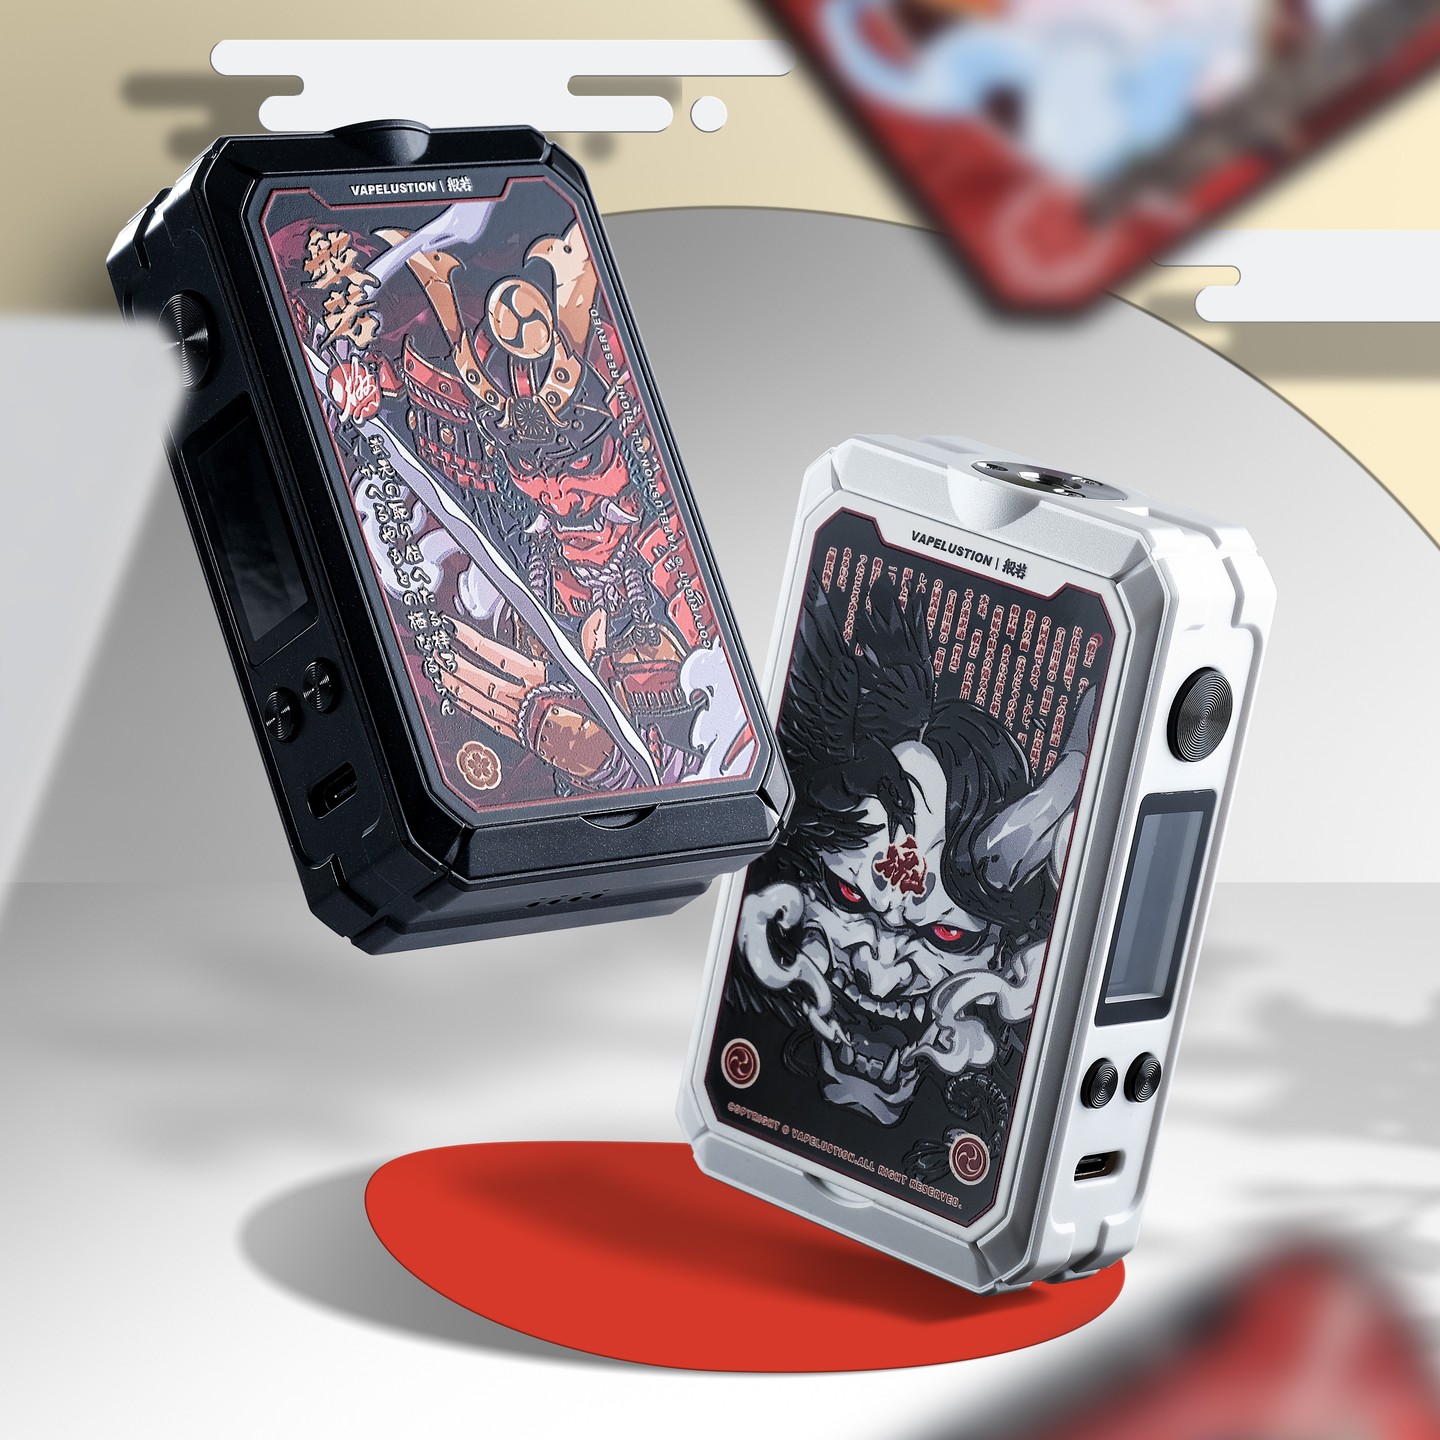
- Black chassis
- White chassis
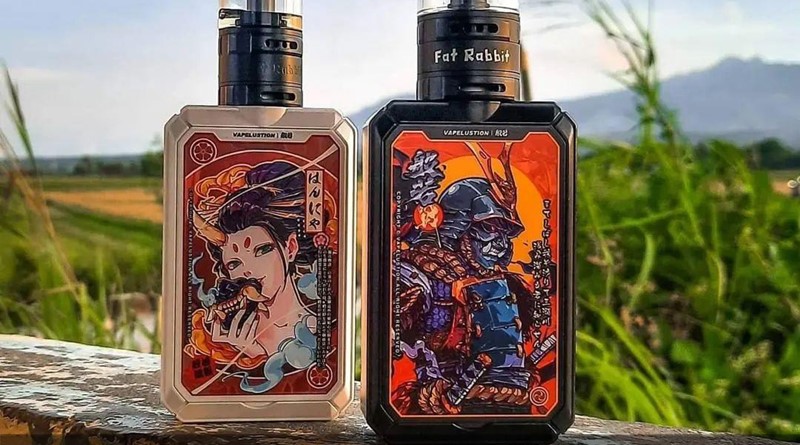
- 4 Different interchangeable side panels
Mod Exterior

Due to the constraints of only being able to upload 10 photos at a time per post, I’m forced to combine many of the photos. I pre-apologize if this makes things more difficult to understand.
Starting from the top photo and working our way down, the front face of the mod has a big round fire button up top. The button itself has a circular bevel to it that adds a slight texture to the button for grip, but is hardly noticeable. Below the fire button is the 0.96 inch LCD screen which you’ll see much more of below. Never mind the scratches you see on the screen – this is a protective sticker for obvious reasons. Below the LCD screen are your [ – ] and [ + ] buttons for scrolling through the menus and changing values such as wattage or temperature. Both the fire button and directional buttons have a hollow clicking sound but a solid feel when pressed. Below the directional buttons is the Type-C charging port. As noted above in the specs, I was only able to reach 0.8A charging speed with the included charging cable, and 1.7A with my own cable. This device does not read a 3.0 Quick Charging cable, so your newer phone chargers will not work on this device. As always, I would advise against internally charging external batteries. Grab yourself an external charger – it’s safer, and will prevent extensive wear and tear on the mod’s chip.
Moving onto the sides of the mod. From this view, you can see the internal skeleton of the chassis. One side has a larger opening than the other – this is the side you insert your two external OEM 18650 batteries. The negative brass connectors (denoted opposite of the positive symbols inside the battery carriage) are spring-loaded and rounded out which is a nice touch to help save your battery wraps from taking a beating. The spring tension is gentle but sturdy preventing any battery rattle for occurring when the side panels are in place. Along the top and bottom of each side panel cutout, you’ll notice thin magnets running horizontally. These magnets do a magnificent job of holding the panels in place however, I did have one pop out on me after having left the mod sit in my car during work. Once it was put back in, I haven’t had any issues with it since. The interior of my car probably reached 130ish or so degrees Fahrenheit that day, so I wouldn’t recommend leaving this exposed (or any mod for that matter) in your vehicle on a hot sunny day.
On the top of the mod is the brass 510 connector. The plate is held in place by 2 torx screws and a longer hex screw and comfortably fits a 26mm atomizer. Thankfully the screws drive down into a metal bracket inside the plastic chassis – I’m starting to get annoyed by all the manufacturers that are screwing the 510s into plastic. Unless the entire top half of the mod comes off, your atomizer should remain stable on the Hannya II. I don’t see any O-rings or anything to help with leaking, so be sure if your atomizer decides to take a long leak onto your mod, that you wipe it down very well. If confident and able, I’d recommend removing the 510 and wiping down the lip the plate sits on. Unfortunately there’s no easy way to get down into the compartment if any residue does end up in that compartment without taking the entire mod apart. If you get confused on which hole the long hex screw goes into, just remember it’s the single hole that sits closest to the side.
Along the bottom of the mod are 8 mock air holes? I’m not sure if these are porous or just there because ventilation holes are usually there.

User Interface
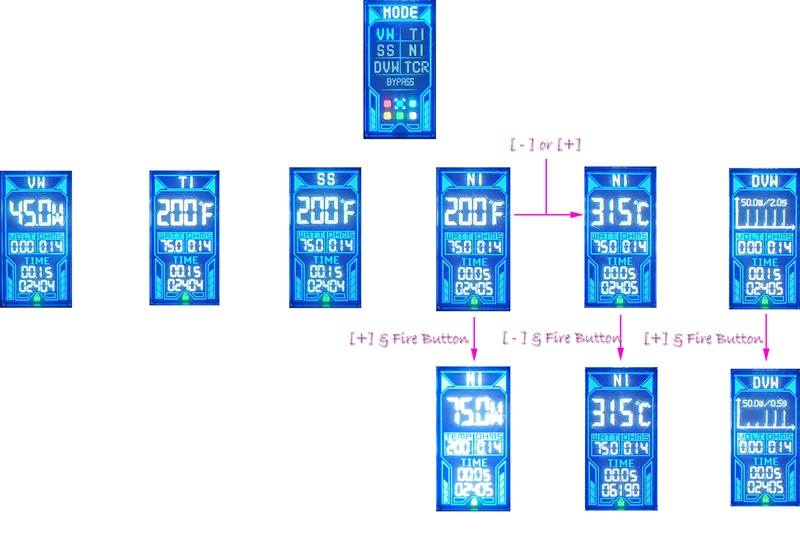
I made a diagram to hopefully best illustrate how to navigate the menus. Before we get into that, let’s go over the shortcut key combo functions:
- Fire button pressed 5 times in quick succession: Powers mod off and on.
- While on, holding the [ – ] & [ + ] directional keys: Will lock and unlock the mod from adjustments (mod can still be fired).
- While on, holding the [ – ] & [ + ] directional keys and the fire button: Will reset the puff counter.
- While on, fire button pressed 3 times in quick succession: Open main menu (seen at the very top in the picture above).
- Holding down the fire button while in any menu other than the default screen will return you to the default screen.
- Available Firing Modes:
- Power (VW): Power controlled by wattage setting.
- Power (DVW): A custom wattage-based power curve you can set to your own liking.
- Bypass: Regulated power drawn directly from the battery.
- TCR: A customizable TC setting for other than Titanium, Stainless Steel, or Nickel
- TC (Temperature Control): Titanium, Stainless Steel, & Nickel
Menu Navigation
To access the main menu, hit the fire button in quick succession 3 times while the mod is on. Using the diagram above, you’ll see one of the available firing modes light up and begin blinking. Press the fire button once to stop the blinking. When the cursor isn’t blinking, you are able to use either directional mode to flip between the 6 default UI color options. Pressing the fire button again will bring the blinking cursor back up again. While the cursor is blinking, you’re able to use the direction buttons to scroll between firing modes.
– VW: This mode allows you control power by a wattage setting. Below 100W, single taps of a direction button will change the wattage in increments of 0.1W. Above 100W and a single tap will change in increments of 1.0W. Holding a directional button down will very quickly accelerate the increments to whole wattages.
– DVW: When selecting this mode, you’ll see at the stop of the screen, a wattage setting followed by a duration of time. By default, the duration of each interval is 2 seconds. Since there are 5 interval settings, holding the fire button down continuously would change the wattage setting for that interval every 2 seconds. My recommendation would be to change this to 1 second, because it’s not very common to fire a mod for 10 whole seconds each time you’re taking a puff. To do that, while in the DVW screen shown on the far right in the diagram above, hold the [ + ] and fire button down until the wattage (left) number begins to blink. Once it starts to blink, you can use the directional buttons to change the wattage value. Pressing the fire button will flip the blinking cursor to the duration (right). Changing this duration down to 1s means for the first second you fire the mod, it will fire it at the wattage you set. Pressing the fire button again will move you to the second interval and back to the wattage setting again. Do this for all 5 intervals and you now have your own custom curve. As seen above, I’ve changed the first two intervals to 50W for 0.5 seconds. This is a good option if you want to add a pre-firing boost each time you fire your mod to get your coil to temperature quicker.
– TC: For simplicity sake, all TC modes (titanium, stainless steel, and nickel) function exactly the same. In fact, for this mod, the Ti, SS, and Ni are simply placeholders for specific TC settings being that you have to set your own TCR value for each mode (this will likely require some googling). Once in a TC mode (Ni for example as shown above), holding the [ + ] and fire button will allow you to change the wattage setting you want. This goes all the way up to 230W and then “Auto” which I’m not entirely sure what this does. Holding the [ – ] and fire button will switch the puff counter to a blinking TCR value. This is where you’d input the TCR value for the coil material you’re using. By default, the TCR value for all TC modes is 6190 shown in the bottom right Ni screen, above. To switch between ℃ and ℉, simply scroll all the way to the lowest or highest temperature in either system and it will switch.
– TCR: Functions exactly the same as Ti, SS, and Ni.
– Bypass: The voltage of the battery is used. I’ve never been a fan of this firing mode simply because as the battery drains, you lose power. Unless you like to top your batteries off consistently, this mode isn’t very consistent.
Lastly, this chip has all of the protections you’ve come to expect from regulated mods these days.


Thoughts, experiences, and observations:
As I’d mentioned in the intro, I’ve put this mod through its paces for a review. I can’t say I’ve had the time to pump 2500 puffs into a device before writing the review, but since this beastly art (“bart”?) has been out for a few months now – I didn’t feel the need to rush this. First off, aesthetically, I love this mod. If you’re into manga-style artwork, this should definitely be on your purchase list. Performance wise, this mod fires very quickly and with the best of them. I’ll be honest, I was a little apprehensive at first about there being replaceable side panels. To me, that just screams potential for looseness. When fully intact, the Hannya II is solid. It’s extremely lightweight being that it’s mainly made out of plastic, but with batteries in it, it has a quality feel. I’ve been using this mod as my daily driver and have left it in my car on more occasions than I’d like to admit. As a result, I’ve had several tanks of juice seeped onto the mod and she’s still ticking. I haven’t seen a drop of juice in the battery compartment which has surprised me more than once. The UI can be a bit counter-intuitive at first, but once you get used to it, it’s a piece of cake to navigate.
Pros/Cons/Considerations
( + )( + ) Pros ( + )( + )
Unique aesthetic
4 interchangeable side panels
Light weight
Lightning fast firing
Decent suite of firing modes
Buttons are very responsive
Batteries slide in and out very nicely
510 plate is screwed into metal
Hand feel is boxy, yet comfortable
All the power a normal vaper would need and then some
( – )( – ) Cons ( – )( – )
Included USB Type-C cable only charges at 0.8A
( – )( +) Considerations ( + )( – )
No brightness adjustment
UI can be difficult to navigate at first
No O-rings under the 510
The small crevasses in the chassis can be difficult to wipe down
Wattage scrolling accelerates so quickly that it’s hard to change 2-3W at a time
Overall Rating
9.0
(High performance art)
I hope I’ve been informative enough to help with any questions you may have regarding Vapelustion’s Hannya II Box Mod. If you’re wondering where you can find this wonderful device, it’s right here. Be sure to log in to your HealthCabin account to see the lowest price available.
This review was written by Zach == Z-Lee from ECF, click to view original review there with more photos and more details.

Vapelustion Hannya II Mod looks like a kool mod!!!